go to Vidar Dicom Viewer page

3D Measurements

3D Segment and 3D Curve

Located in the corresponding button groups "Segments" and "Curves"
3D Segment
  • Click at the start point of the segment, scroll through the images using the mouse wheel, click at the end point
In MPR mode, the segment will be displayed in all three projections
3D Curve
  • Click on the curve points, scrolling through the images with the mouse wheel, double-click at the end of the curve
  • Right-click on the curve to add a point inside it
  • To add a point at the beginning or end of the curve, use the "More..." item (see Measurement Manipulations)
In MPR mode, the curve will be displayed on all 3 projections
After creating a 3D curve, you can create a cMPR (curved MPR) by using the corresponding item in the "More..." menu
Details on cMPR mode

Density Measurement in a Volume

To measure density at a "point" in a volume, use the "3D Sphere" tool, analogous to the "Density" in 2D
3D Sphere Depending on the Settings:
  • Hover the mouse cursor over the center or edge of the region of interest
  • Press and hold the left mouse button in the center of the region (otherwise - at the edge)
  • Move the mouse to define the radius (otherwise - diameter) of the sphere
  • Release the left mouse button

Not available in 2D, use the "Density" tool

Click the icon
to open
the 3D Sphere menu
Configure 3D Sphere parameters:
  • In the appeared menu, click on the "Sphere Settings" item
  • Then, in the appeared window, set your preferences
  • You can also set preferences via the Program Settings:
    Tools tab - 3D Sphere - Set Up

Volume Construction by Contours

Left-click the button in the tool panel, in the "Density" button group

Button Function Mouse
Volume Construction
by Contours
Creating the first contour:
  • Left-click on the contour points
  • Double-click on the last point to complete the first contour of the volume
Creating the second and subsequent contours:
  • Scroll through the images with the mouse wheel
    The program will automatically create intermediate contours
  • You can either build subsequent contours similarly to the first one, ignoring the editing of intermediate ones, or edit points of the intermediate contours
Editing points of intermediate contours:
  • Hover the mouse cursor over a point until it enlarges and turns black
    Press and hold the left mouse button, move the control point of the curve by moving the mouse
  • Control points are added and deleted by right-clicking on a selected point
Completing the volume construction by contours:
  • Click the checkmark button near the last contour
  • This will complete the volume construction
  • The volume region will appear on all projections

After construction, a window will appear:
  • Edit the volume name in the field if necessary
    1. set fill color
    2. copy result to clipboard
    3. show additional measurement results
    4. edit volume
    5. delete volume
Managing the constructed volume:
  • Hover the mouse cursor over the constructed volume
  • The volume result and two buttons will appear
  • Click to delete the volume
  • Click the "More..." button to edit the volume
  • Other manipulations are similar to other measurements

The volume can also be deleted from the Finds List
For volume settings, see Volume by Contours Settings

Volume Construction by Density

Left-click the button in the tool panel, in the "Density" button group

Button Function Mouse
Volume Construction
by Density
Construction options:
  • Press and hold the left mouse button for the region of interest to grow
  • Click at two points to create a linear region of interest
  • When using a point as a reference, place the mouse cursor in the center of the area of interest, press and hold the left mouse button
    Then release the button
Volume editing:
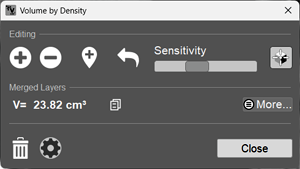
  • - Increases the volume region
  • - Decreases the volume region
  • - Adds a region to the volume
  • - Consistently undoes the last action
  • The slider allows to set sensitivity
    The higher the sensitivity, the greater the capture of adjacent densities
  • - Hide/show the 3D cursor and 3D lines
  • - Allows copying the result to the clipboard
  • Clicking the "More..." button expands and collapses additional calculation results (density characteristics)
  • - Deletes the volume
To complete the volume construction by density click the "Close" button

See also - 3D Marker
Vidar Dicom Viewer Help 3.0, © 2026 PO Vidar