4 panels are displayed on the screen, one of which is the 3D model
Switch to 3D Model mode (3D) from the MPR (Multiplanar Reconstruction) mode
4 panels are displayed on the screen, one of which is the 3D model

 - disabled
 - enabled
 - disabled
 - enabled
 key on the keyboard
 +
+  on the keyboard
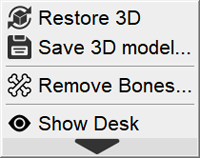
 a menu will appear: