The program is intended for dentists in various fields (orthodontics, prosthodontics, implantology, general dentistry) and maxillofacial surgeons
Construction of the orthopantomogram reference curve, cross-sections, and 3D model occurs automatically, significantly optimizing the diagnostic process
Launching the Program
For General Practitioners
Click in the Toolbar, "Studies" group, on the "Programs" button
Click the "Orthopantomogram" button
For Dentists
Press the key combination and on the keyboard
In the appeared window, click the "Specialties" tab
In the "Specialties" tab, click the "CT" item
Click the down arrow next to the "Display on screen" item
Click the "Orthopantomogram" item in the drop-down list
Click the "Save" button at the bottom of the window
Restart the application
Please note: ALL CT studies, regardless of anatomical region, will be presented as dental studies
If studies of other areas are performed, it is better not to enable this function
The program is presented in 5 viewing modes:
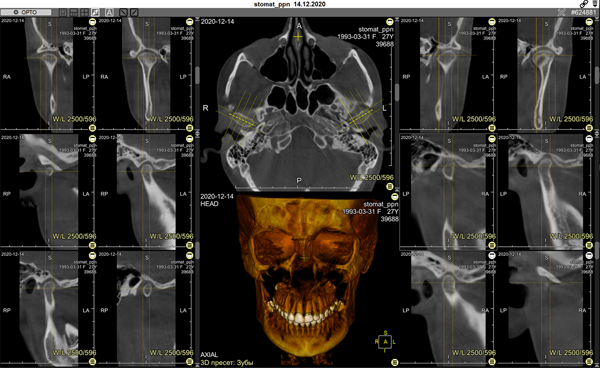
1 Mode
- axial scan, orthopantomogram, dental cross-sections, and 3D model, opens by default
Button - in the series header
Designed for correcting the reference curve and detailed examination of teeth and jaws
Allows analyzing skeletal symmetry, identifying unerupted and supernumerary teeth, and accurately identifying root resorption and orientation, etc.
In the header of the lower right panel - toggle buttons: "Cross-sections" and "MPR" allowing selection of optimal tooth display:
Cursor Control
In the "Ortho" program are two types of cursors: 3D cursor (yellow cross) and linear cursor (red line)
The 3D cursor allows selecting a point on all projections
The linear cursor sets the reflection of planes on all projections
Notes:
Angle values are not reliable
Size values and statistics of planar areas are not reliable
Editing the Reference Curve
Holding the left mouse button and moving the mouse moves the entire curve (mouse cursor - on the curve)
If the patient has a pronounced subincisal fossa, there may be a defect in the center of the lower jaw on the orthopantomogram
To eliminate it, scroll the axial scan to the lower jaw and move the curve accordingly along the lower jaw
Note: this may worsen the display of the upper jaw on the orthopantomogram
Holding the left mouse button and moving the mouse allows moving points (mouse cursor - on a point)
Right-clicking can delete existing points (mouse cursor - on a point) or add new points to the curve (mouse cursor - on the curve)
To return to automatic curve construction, click the button
Note: Too sharp bends in the curve create artifacts on the resulting surface
2 Mode
– cephalometric analysis (orthopantomogram and MIP)
Button - in the series header
To perform cephalometric analysis, use the standard measurement tools
3 Mode
- standard 3 MPR projections and 3D model
Button - in the series header
Allows analyzing the facial skeleton
It has full functionality for managing volumes in CT
Projections: oblique, curved, MIP, MinIP, and Average
Arbitrary volume rotations, synchronization of manipulations across all projections
- temporomandibular joint (TMJ) analysis
Button - in the series header:
Allows analyzing TMJs
Creates 2 projections parallel to the long axis of the condylar head and 4 perpendicular projections, allowing full assessment of the condition of both TMJs and their comparison
Scroll the axial image until the heads of the mandibular condyles are visible
Click the button
With two mouse clicks (at start and end), construct a reference line along the central line of the right TMJ head (located on the left side of the image)
Moving the Endpoint of the Reference Line
Hover the mouse cursor over a control point
Press and hold the left mouse button
Move the mouse to drag the control point
Release the mouse button
Move the Reference Line
Hover mouse cursor over a line away from the control points
Press and hold the left mouse button
Move the mouse to drag the segment
Release the mouse button
Click the button and repeat the actions for the left TMJ
Saving Construction Results
Save to Continue Working
The reference curve and reconstruction results are automatically saved in the Finds List upon exit (if program settings are not changed)
To redisplay the reconstruction, click the program name in the Finds List
Saving Orthopantomogram for Export or Archiving
Click the "Dental" button in the upper left corner of the series header
In the appeared menu, select the item - "Save Resulting Series", and click it
The entire resulting Orthopantomogram series will be saved
In the Preview Bar, it will be located at the end of the study
To save a separate image from any of the reconstructions
One Image:
Activate (single click) the frame for saving
Click in the toolbar, "Studies" group, "Save Image" subgroup:
- will save only the image of the active frame to a user series
Entire Screen:
Click in the toolbar, "Studies" group, "Save Screen" subgroup:
- will save an image of the entire screen to a user series
Program Settings
Click the "Dental" button in the upper left corner of the series header
In the appeared menu, select the item - "Settings", and click it
In the appeared window, set the parameters for the resulting series
- Restore default settings
- Save settings
Exiting the "Ortho" Program Mode
Click the "Exit Mode" item in the "Dental" menu
The screen layout will return to standard
Useful Tips
While constructing the curve, hide the 3D cursor and lines (key on the keyboard) to avoid interference
After construction, restore them to the screen using the same method
When editing the curve, enlarge the frame by double-clicking it,
after editing, return it to its original size using the same method


 and
and  on the keyboard
 in the series header
 button
 in the series header
 in the series header
 in the series header
 in the series header:
 button
 button and repeat the actions for the left TMJ
 - will save only the image of the active frame to a user series
 - will save an image of the entire screen to a user series
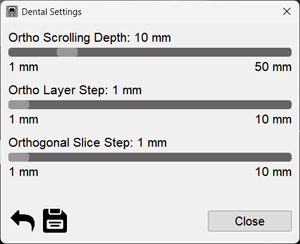
 - Restore default settings
 - Save settings
 on the keyboard) to avoid interference