Accessing the List of Catheters - Click on Any of the Buttons
In the tool panel or program menu - the "Angio Calibration" button
In the angio film control panel - the button
In the lower right corner of the image - the active overlay, item "Calibration"
Click on the "More..." item to display all available catheter calibrators
Selecting and Setting the Catheter Calibrator
Find the frame with the best visualization of the catheter in the angio film
Pause the film
Open the catheter list as described above
In the list that appears, click on the name of the catheter that was used for the examination
Click on the image of the catheter in the freeze frame
Correction of the Position of Segments Relative to the Catheter Walls
Hold down the left mouse button and move the mouse
Mouse cursor on:
Central segment - move
Lateral segment - adjust width
End of the segment - rotate
Release the left mouse button
Managing the Calibration Object On-Screen
Hover the mouse over the calibrator
Clicking the 
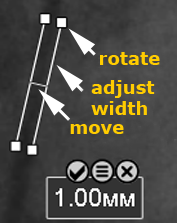
button applies the calibration and hides the calibrator
Clicking the button cancels the calibration and hides the calibrator
Clicking the button brings up the catheter list (the catheter can be changed during calibration)
Active Overlay
The active calibration overlay in angiography differs only in the "More..." item, clicking on which displays the full list of catheters
Edit the List of Catheters
In the list of calibration objects, click on the Edit item
In the list that appears - click the edit button to edit a calibration object, or - to delete
Edit the parameters of the calibration object and confirm with the OK button
Create Your Own Calibration Object
In the list of calibration objects, click on the Edit item.
In the list of calibration objects, click on the button
Enter the parameters for your calibration object and press the OK button
Custom Calibration
In the list of calibration objects, click on the Custom item
Enter the value in the window that appears
Draw a segment outlining the size of the object on the screen