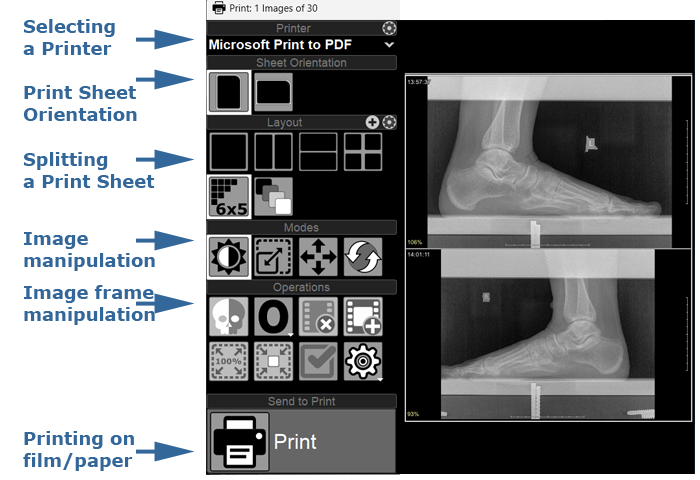
The left side contains tool panels, the preview bar with sheet thumbnails, and directly the print screen
Manipulating the Print Window
Minimize the print window to the program's toolbar
Click the Minimize button in the upper right corner of the print window
The print window will minimize to a thumbnail in the lower part of the program's toolbar
To restore the print window to its original size, click on the print window thumbnail in the toolbar
Maximize the print window to full screen
Click the Maximize button in the upper right corner of the print window
Click the button
to restore to the original size, or the Minimize button to minimize to a thumbnail on the toolbar
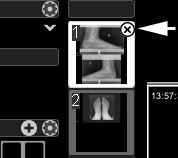
Print Preview Bar
Located in the print window between the tool panels and the screen.
Shows the number of sheets and frames in them
When hovering the mouse cursor over a sheet thumbnail, a cross appears; clicking it will delete the sheet
When changing the layout, empty pages are automatically removed
Change Sheet Orientation
Click in the upper part of the print window:
or
The sheet will take portrait (vertical) or landscape (horizontal) orientation
Dividing a Print Sheet into Frames
Click on the desired layout on the left in the print window, for example:
- 2 vertical areas,
- 2 horizontal areas
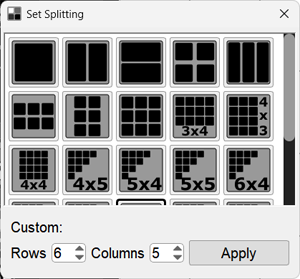
Dividing a Print Sheet into an Arbitrary Number of Frames
Click in the layout panel of the print window:
In the appeared window:
Click on the desired layout,
or
Enter the desired number of columns and rows.
Click the Apply button
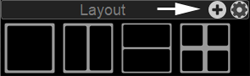
Create a Custom Sheet Layout
Enter the desired number of columns and rows
Click the Apply button
The new layout will appear in the print window
If such a layout already exists, the program will report it
Click the Add current layout to list button
The new layout will appear next to the others in the Layouts panel
Frame Manipulations
Frame - an area on the print sheet of the print window for inserting an image
Selecting Frames in the Print Window
Mouse click (cursor on frame) selects 1 frame
Holding the key and mouse clicks selects non-adjacent frames
Holding the key and mouse clicks selects adjacent frames
Select / Deselect all frames - click the button in the print window's toolbar
Deleting Images
Select frames in the print window as described above
Click the button in the print window's toolbar
or
Press the key on the keyboard
Confirm deletion
If multiple frames are selected, all will be deleted
When deleting images and reducing their number, empty pages are automatically removed
Insert an Image Between Existing Ones
Select a frame in the print window as described above, before which you want to insert an image
Click the button in the print window's toolbar
or
press the key on the keyboard
An empty frame will appear before the selected image
Add an image from the screen to the print sheet
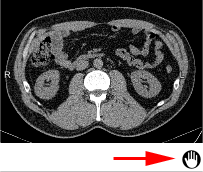
Move an Existing Image Within a Sheet
Hover the mouse cursor over the image you want to move
Hover the mouse cursor over the appeared hand icon and click on it
Hold down the left mouse button and move the image to another frame
Release the left mouse button
Movement is only possible within one sheet
Replace an Existing Image
Delete the image in the print window that you want to replace
Select the image that took its place
Insert an empty frame before it
Add the replacement image from the screen to the print sheet
All operations are described in detail above
Print the Sheet on a Printer
After the print sheet is fully formed, press the button:
the sheet will be printed
a confirmation prompt to close the print window will appear
Cancel Printing the Sheet
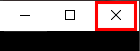
If for some reason you need to close the print window without printing the images to a medium (film or paper):
Click the cross button in the upper right corner, without pressing the "Print" button in the print window:
The program will ask to confirm the cancellation of printing
 Click the "Print" tool in the toolbar
 Press the P (Print) key on the keyboard
 on the toolbar
 +
+ 


 or
or

 - 2 vertical areas,
 - 2 horizontal areas

 key and mouse clicks selects adjacent frames
 button in the print window's toolbar
 button in the print window's toolbar
 key on the keyboard
 key on the keyboard