Left-click on the "Programs" button in the Toolbar, then - on the
"PET" button
Settings upon Program Entry
The program automatically searches for CT and PET series with attenuation correction, and the same (if possible) slice thickness
If necessary, these parameters can be changed:
Select a different PET series
Select a different CT series
Enter patient data necessary for calculations if it was not entered
Study time
This data is necessary for SUV calculation:
SUVbw is calculated using the formula:
SUVlbw is calculated using the formula: SUVLbm = valueBqml * lbm * 1000 / totalDoseBQML
where
For males: lbm = 1.1 * patientWeightKg - 120 * r * r
For females: lbm = 1.07 * patientWeightKg - 148 * r * r
r = patientWeightKg / patientHeightCm
PET Program Interface
The screen will be split into four panels (left to right, top to bottom):
PET, MPR, and Fusion Mode (MPR+PET) panels are synchronized with each other
To unsynchronize them - click the chain icon in the upper right corner of the study header:
Creating SUV Regions - Standardized Uptake Value
Click the - 3D sphere button in the toolbar, Measurements block, Density group
Move the mouse cursor to a pathological focus on the image in any panel
Hold down the left mouse button, move the mouse to create a sphere, release the mouse button
The SUV measurement result will appear in the text block, next to the sphere
Multiple spheres can be created
Moving from one sphere to another is most convenient in the program's Finds List
Selecting SUV Values to Display
The program automatically calculates SUV based on parameters entered before the study
If it is necessary to adjust the types of results:
Click the "More" button next to the measurement result
Left-click to place checkmarks next to the necessary items
You can also set a threshold for MTV and TLG calculation and configure sphere creation methods
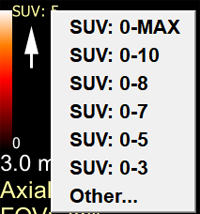
Using SUV Presets
Left-click on the SUV value above the scale in the lower left corner of the panel:
Click on the required preset in the appeared list
To set a different upper limit for the range, click on the "Other" item
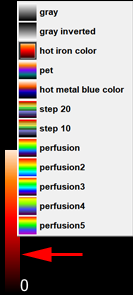
Changing the Color Scale
Left-click on the color scale in the lower left corner of the panel:
Click on the required scale in the appeared list
Managing Image Overlay
The overlay (Fusion) of CT and PET images is located in the upper right panel of the program
In case the volumes do not match (patient moved, etc.), you can adjust the image shift by unlocking the layers:
Left-click the white rectangle in the upper left corner of the series header, to the right of the Fusion button, to edit only the top layer
hold the right mouse button to shift the top layer relative to the bottom one
move the layer along with the mouse
release the button
Left-click the white rectangle again to lock the layers
PET Program Finds
All findings, regardless of the mode in which they were made, are located in the series header
When a find is called (left-click on it in the list), switching between modes is done automatically
 in the Toolbar, then - on the
 "PET" button
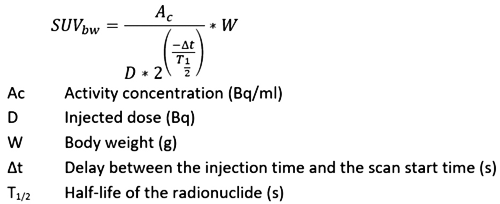

 - 3D sphere button in the toolbar, Measurements block, Density group
 next to the measurement result