Configuring Window and Tool Panel Sizes and Positions
To change tool panel sizes, Preview Bar width, window geometry,
click the icon in the right corner of the main menu, then - Customize Interface Geometry
The program will switch to the mode for configuring the position and size of interface elements
All interface elements will be divided by separator lines
Separator lines and panel headers are the main configuration tools
Change the Size of a Program Interface Element
Hover the mouse cursor over a separator line
Hold down the left mouse button
By moving the mouse, drag the border of the program interface element
By moving the mouse, drag the Tool Panel, or Preview Bar, to the desired part of the program window
Release the left mouse button
Tool Panels can be placed at the top or bottom of the screen
They can be placed one after another, and the desired one can be selected using tabs
Arrange the elements of the main program window as you wish
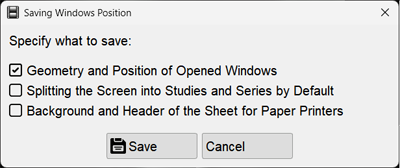
Saving Settings
To finish configuring the geometry, click the
icon in the right corner of the main menu and click the Accept Interface Geometry item
The positions and sizes of windows and panels on the screen will be saved
Saving the Position and Size of Auxiliary Program Windows
Windows like Print, Study Archive, etc. can be moved and resized, just like in Windows
Set the position and size of a particular window by dragging it by the title bar, or by dragging its borders (hold left mouse button, move mouse, release button)
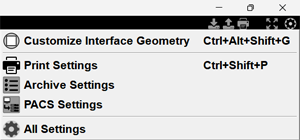
 icon in the right corner of the main menu, then - Customize Interface Geometry
 icon in the right corner of the main menu and click the Accept Interface Geometry item
 +
+  +
+ +
+  .
.